

_________________________________________________________________
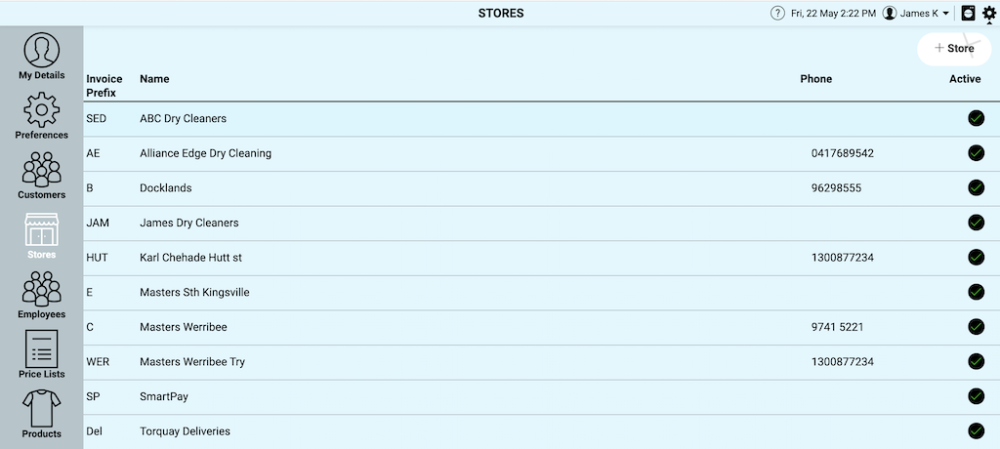
To add a store to the system – right side click on + Store. This will allow you to Add a store to the system.
Once you have selected + Store, you will see in the screenshot below to enter store details in relation to add store address details, including address, invoicing, receipting, message templates, and, delivery and pickup options. If the store has Metalprogetti access, the number of the store can be tagged to the Metalprogetti system as shown in the bottom right hand corner of the screenshot below.
In the example below we have chosen an existing store ABC Dry Cleaners as a store example to work through.
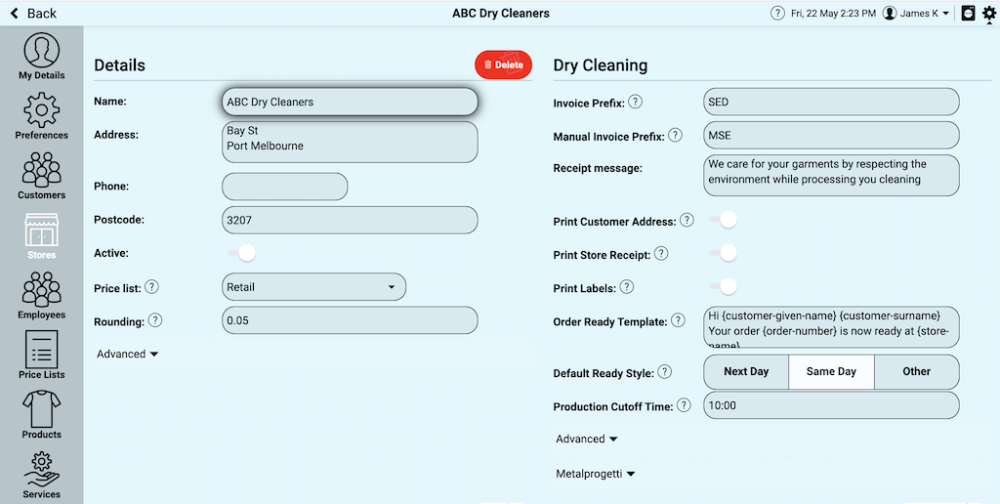
We will now follow in sequence each of the options that can be selected on the right hand side of the screenshot shown above:
Invoice Prefix – are any characters (3 max) that will proceed the invoice number on the ticket
Manual Prefix – is the same as above but adds a different prefix if the ticket number has been changed eg. Agents
Receipt Message – is a store message that is printed on each Order – promotional message or store hours.
Print customer address – On or Off (if On it will print the customers address on the Ticket)
Print store receipt – On or Off (If On the system will always print a store receipt and prompt to print/email/sms the customer receipt)
Print Labels – On or Off (whether the system will print the tags for the clothes) Some stores may have RFID or barcoded items and may not want the Tags to print.
Order Ready Template – (This is a template that can have customer information merged into the message for SMS Some available template fields are listed in the Question mark next to the Order ready template (I had to replace { with [ as the manual wouldnt allow the character” [order-number], [store-name], [drycleaner-name], [customer-given-name], [customer-surname]”. Example “ Hi [customer-given-name], [customer-surname], Your order # [order-number] at [drycleaner-name] is ready for collection. Thanks for your business”
Default Ready Style – You can also set the default ready time for Orders written to be Same Day with a cutoff time, Next day or Other eg 3 day service. Same Day with a cutoff time means that orders that come in prior to the cutoff time will be set to same day as default and after the cutoff time the order will be defaulted to the next day.
Production Cut Off Time – The time orders must arrive by to be ready on the same day
Now let us go to Advanced Store Options as shown below
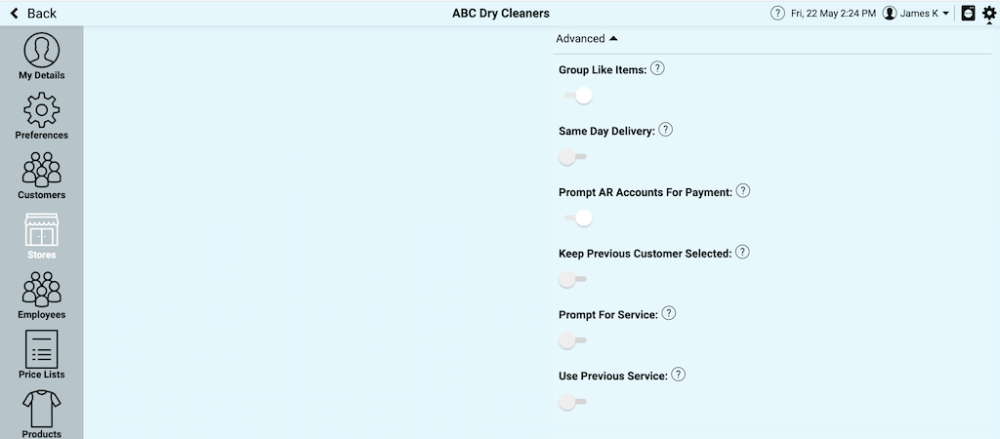
Let us follow each of the options in sequence:
Group Like items – (this will automatically group all the like products eg 15 white shirts and put them on one line rather than 15 lines, If the item has a different colour or stain it will be separated from the other items
Same Day Delivery – (set to ON if the store receives the work and delivers on the same day)
Prompt AR Accounts for Payment – if OFF then the customer will not be prompted for Payment if the customer is a AR customer (Xero account customer)
*Keep Previous customer select *- (allows you to repeat the same customer when booking in work – handy for Hotels or agencies or customers that want multiple tickets – eg dry cleaning ticket, shirts, household all on separate tickets.
Prompt for Service – (prompts the operator for which Service/Category to use- You can mix services in the same Ticket
Use Previous Service – (heat seal items look for the previous service used on the heat seal to automatically choose the service)
Use Tagging Tracker: (This ensures you add a heat seal or a permanent ID to each piece of an order before you confirm the order)
Auto Post Orders: (Post the orders and flag them as posted for people that do not use Xero as their accounting system – eg. MYOB or Quickbooks – This will then not require payment at Pickup – Order collection)
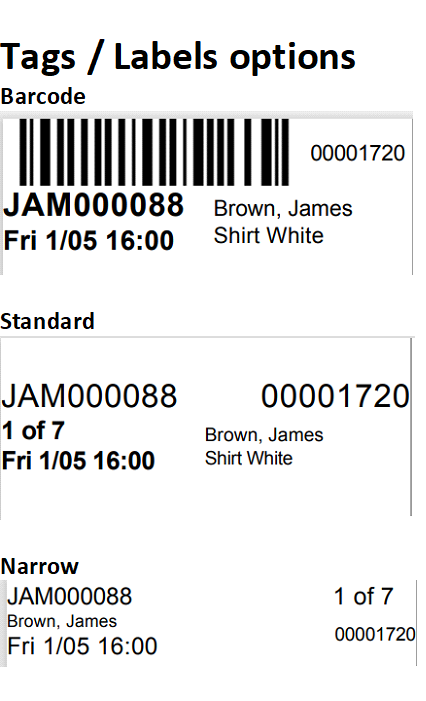
Item Label Type: Narrow / Standard / Barcode (garment tag options. 3 types of tag formats)
Show Service per Item: (Show the service on the ticket – eg Dryclean or Wash and Fold Repairs
The Metalprogetti Logo option shown in the screenshot below is the logo number used for the store that is stored in the Metalprogetti system.
Adding Stations or Locations for your store. Each Station can be named and it can be set to display eg. Front Counter, Mark In, Spotting, Repairs, Pressing 1, Pressing 2, Assembly, Conveyor, Van

You define what the station is by the Station Type. If you have 2 cash drawers then you will need 2 Entry Stations. If you have 1 cash drawer then you only need 1 Entry station. If you have an automated assembly conveyor then you will need a Metalprogetti Automated Assembly station. If you have a Storage conveyor then you will Need to set the type to be Storage. This will drop a file to spin the conveyor to the folder eg. \\PC1\Transfer\ Most storage conveyors need to be set to Metalprogetti Basic, CaSort with a spinning conveyor needs to be set to Metalprogetti Basic
Shown below under Advanced Settings on the left hand side of the screenshot below, you can add a Store Logo, which will override the primary Company Logo that had been set up in Preferences. This allows each store to have their own logo as required
![]()
Shown below is the option to Integrate with Xero Accounting by adding your Xero User name and you Xero password.
You need to setup your Sales account eg. Sales-Dry Cleaning
You need to setup your Product in Xero eg. DryCleaning
You need to setup Xero for all of the stores that you want the charges to come to Xero from . eg. Store 1,2,3,4,7,9

You can also Integrate the system with SmartPay Credit Card Terminals as shown in the above screen shot
SmartPay terminal application form
————————————————————————————————————————————————————————————————-
***Procedure to setup a Payment Terminal in the software – Load the software*
In the POS
Ticket Writing
other commands
pair smartpay
give the terminal a Name eg. Eftpos1
Pairing code (Enter pairing code)
To find the pairing code
On the hand held terminal
Press
Menu
3. Config
PW 833767
1. Pos Integration
1. Authorise Pos
It will display the pairing number
Now when you PAY or Prepay and order and select the credit card it will transfer the amount to payment terminal
Other setup
Settings button
(top right hand corner)
Store options
Select the store
Payment Terminal Integration – Save
Post your comment on this topic.